
Decoupage Oyster Shells: A Unique Gift Idea
- Majo

- Apr 15, 2025
- 2 min read
Updated: Aug 7, 2025

In this blog, we’ll dive into the enchanting world of decoupage oyster shells, a unique and eco-friendly way to create beautiful gifts that are perfect for any occasion.
Oyster shells, often discarded after enjoying a delicious seafood meal, can be repurposed into charming decorative items with a little creativity and effort. Whether you’re looking to craft personalized gifts for loved ones or simply want to add a touch of coastal flair to your home decor, decoupage oyster shells offers a versatile and artistic outlet.
Join us as we explore the materials, techniques, and inspiration behind this captivating craft. From selecting the perfect shells to choosing beautiful papers and embellishments, we’ll guide you through each step of the process, ensuring your creations are not only beautiful but also meaningful. Let’s embark on this artistic journey together and discover how decoupage oyster shells can turn into cherished gifts that tell a story!


Instructions for Decoupage Oyster Shells
Here is how I did it:
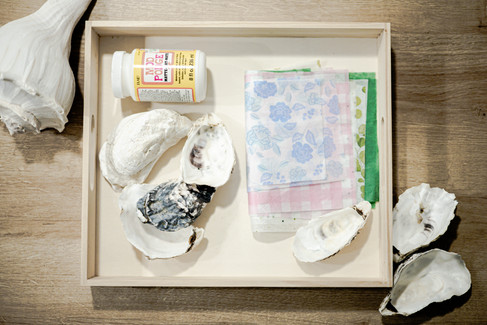
Materials Needed
Steps
Prepare the Oyster Shells: Ensure the oyster shells are thoroughly cleaned and dried. Remove any remaining bits of meat or debris.
Choose Your Design: Select decorative paper or fabric that you want to use. Cut it into desired shapes or sizes to fit the oyster shells.
Apply Decoupage Medium: Using a brush or sponge applicator, apply a thin layer of decoupage medium to the surface of the oyster shell where you will place the decorative paper.
Adhere the Paper: Carefully place the cut pieces of paper or fabric onto the shell, smoothing out any bubbles or wrinkles as you go. You can use your fingers or a clean brush for this.
Seal the Design: Once the paper is in place, apply another layer of decoupage medium over the top to seal it. Make sure to cover the edges of the paper well.
Drying Time: Allow the oyster shells to dry completely. This may take a few hours depending on the thickness of the medium used.
Apply Additional Coats: For added durability, consider applying additional coats of decoupage medium, allowing each coat to dry before applying the next.
Optional Sealant: If desired, finish with a clear sealant for extra protection, especially if the shells will be displayed outdoors. You may also paint the under side of the shells a different color, like golden.
Tips
Experiment with different textures and patterns for a unique look. You may even paint the shells too!
Use a variety of shell sizes for an interesting display.
Consider adding embellishments like glitter or beads for extra flair.

Enjoy your beautifully decoupaged oyster shells as decorative pieces or gifts!


Comments